JERBO is a free web-based application which facilitates project development with Scrum. It helps to focus on getting things done leaving the agile team freedom to find its own way to do Scrum. JERBO was designed for Scrum methodology and contains just those features which help you to plan and track your Scrum projects. It is a better and more interesting and organized way to Scrum for the team.
If you are new to Scrum, you definitely need to read some books about the methodology and some stories about how it has been done by others, especially who are doing it well. As Scrum is just a set of general guidelines and principles and there is no manual telling you how exactly to do it, you will need to experiment and continuously adapt the process to find your own way to do your project in an agile way based on your project context. Simple and well-focused Scrum tool like JERBO will be very helpful in doing Scrum in a more effective way and increasing collaboration, transparency and flexibility to adapt to the emerging business realities.
"Scrum and XP from the Trenches", by Henrik Kniberg has provided the JERBO team with lots of inspiration and ideas. We highly recommend this book for JERBO users and those who want to know good stories about how other teams do Scrum.
If you have already used whiteboard or spreadsheets to do Scrum, then you probably started thinking about how to do it better. Those means could still be good in some cases but definitely not enough when you need to share project information and your team is geographically distributed, or you need to limit access to some project information, or your need to run reports and track project history.
JERBO is free, simple, easy to use and install, and contains everything you need for scrumming. It is a web application which contains only four screens: one to manage users and project access, and other three for project development with Scrum. JERBO will become your Scrum software if you are looking for simple and focused Scrum planning application with the following features:
We believe that JERBO will make it simple to start scrumming and execute your Scrum project effectively.
JERBO-1.0-RELEASE is the latest release of the application and it should run on the most Unix, Linux, Mac, Mac Server and Windows systems and supported by all modern browsers: Internet Explorer starting from version 10.0 and all latest versions of Google Chrome, Firefox and Safari.
JERBO is available in two distributions: web application archive and Windows GUI installer.
When preparing to install JERBO, you should decide which distribution format to use for the installation. For Windows users and users with no Java experience Windows GUI installer is the right choice.
Windows GUI installer is the simplest and easiest way to install JERBO with all required components preconfigured. It installs and configures the following:
There is no additional software installation or manual configuration required.
Web Application Archive is more generic and platform agnostic distribution format. It contains JERBO web application archive only and requires installation and configuration of the following additional software: Java Runtime [version 1.6 or above], Tomcat server [version 7.0 or above], and MySQL database [version 5.1 or above]. This distribution becomes helpful if you already have Java, Tomcat and MySQL already installed on your computer or for Linux or Mac OS users who cannot use Windows installer.
JERBO installation using Windows GUI installer is straightforward:
After the successful login you will be redirected to the JERBO Admin View. Change and remember new administrator credentials. At this moment, JERBO is up and running and you are ready start using it for your Scrum project.
To be able to run JERBO web application you will need download and install the following software:
Please follow installation instructions and ensure that your can start-stop Tomcat and MySQL instances before you proceed to the next step.
Before you deploy JERBO you have to create MySQL database and user accounts which will be used by the application. If you are planning to use values other than those provided in the example [which is strongly recommended] you will need to update the JERBO application property file stored in the following location:
<TOMCAT_HOME>\webapps\jerbo\WEB-INF\classes\app-config.properties
Tomcat server must be restarted for the change to take effect.
Default database configuration properties are:
Database name: jerbo_db
Host:localhost
Port:3306
User name: jerbo_db_user
Password: jerbo_prod_#
mysql -u root -p
create database jerbo_db;
create user 'jerbo_db_user'@'localhost' identified by 'jerbo_prod_#';
grant all on jerbo_db.* to 'jerbo_db_user'@'localhost' identified by 'jerbo_prod_#';
<TOMCAT_HOME>\webapps\
On Unix, edit [create] ‘setenv.sh‘ file and add:
export CATALINA_OPTS=" -Xms128m –Xmx768m -XX:PermSize=64m -XX:MaxPermSize=256m"
On Windows, edit [create] ‘setenv.bat‘ file and add:
set CATALINA_OPTS=”-Xms128m -Xmx768m -XX:PermSize=64m -XX:MaxPermSize=256m”
If you need to modify database configuration properties, stop Tomcat and update the following file:
<TOMCAT_HOME>\webapps\jerbo\WEB-INF\classes\app-config.properties
Open browser and open the following url: http://[your_hostname]:[port]/jerbo-[version]
http://localhost:8080/jerbo-1.0-RELEASE
If installation and deployment went well you will see the JERBO login page. Login as administrator with the default credentials:
Username: jerboAdmin
Password: jerbo4Admin
After the successful login you will be redirected to the JERBO Admin View. Change and remember new administrator credentials. At this moment, JERBO is up and running and you are ready start using it for your Scrum project.
Before you start using JERBO you first need to familiarize yourself with the application user interface and conventions. Alternatively you can go to the Quick Start section of this guide if you prefer a jump start.
There are three roles in JERBO from the security and permission perspective: ADMIN, USER, and GUEST. All members of Scrum team must have USER security role and will have one of the following roles in Scrum team: Product Owner, Scrum Master, or Developer.
ADMIN – this role is for the users with administrator"s privileges. Administrators have access to the admin view and can create and delete projects, add new users, and grant and revoke project access to the users.
This role is to be used for administrative purposes only. Users with this role couldn’t be part of the SCRUM team. If you are planning to be the administrator and a member of the Scrum team, you have to create two different users, one with ADMIN and another with USER security role.
Since this version of the application doesn’t provide password recovery and 'forgot password' functionalities, it is strongly recommended to have several ADMIN users.
USER – this role is for all SCRUM team members [SCRUM master, developers and the product owner]. Users with this role have all permissions except those reserved for the administration.
To work on a project, any USER has to be granted project access.
GUEST – this role is for the users with view-only permissions. Users with this role have access rights as regular USER but cannot modify [add, remove, delete] project data.
To let user with the GUEST role access project information, it has to be granted project access.
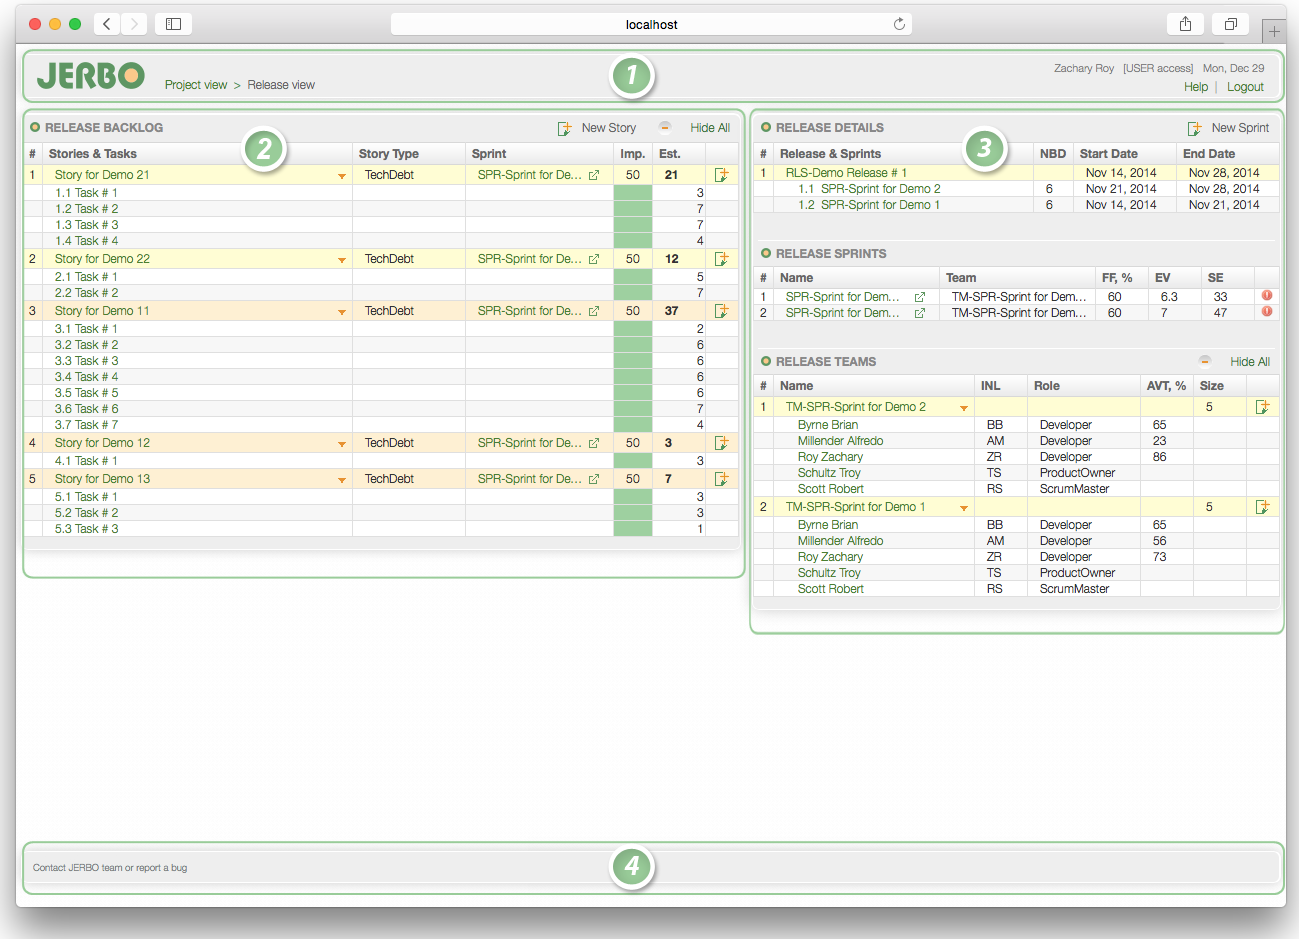
There are four application views: Admin, Project, Release, and Sprint. Each view consists of one or two panels, and the panels in turn could contain several tables. The following image shows the application interface, followed by its main components description Release View Screenshot
Many application actions are decorated with icons. Listed below are the different icons your will see in JERBO:
| Icon | Description |
|---|---|
| Action Icons | |
| Create/Add new instance. | |
| Update/Edit instance. | |
| Delete instance. | |
| Filter Icons | |
| Expand row. | |
| Collapse row. | |
| Expand all rows. | |
| Collapse all expandable rows. | |
| Show tasks with status "Not Started". | |
| Hide tasks with status "Not Started". | |
| Show tasks with status "In Progress". | |
| Hide tasks with status "InProgress". | |
| Show tasks with status "Impeded". | |
| Hide tasks with status "Impeded". | |
| Show tasks with status "Done". | |
| Hide tasks with status "Done". | |
| Show my tasks only. | |
| Reset filter. | |
| Other Icons | |
| Warning notification icon. | |
| Change view. | |
| Ascending ordering | |
| Descending ordering | |
Navigation and action links are green. You can use a navigation link to change the application view and an action link to open modal window for editing. All navigation menu links are view change links, as well as all panel tables links followed by the ‘Change view’ icon. For example, sprint name in the ‘Release Sprints’ table [or ‘Release Backlog’ table] is a change view link and opens ‘Sprint View’. In contrast, story name in the ‘Release Backlog’ table is the edit link and opens edit story modal window.
To keep tables compact multiple table headers contains acronyms and abbreviations. Place the mouse over the table column header to see its meaning.
Some tables have sortable columns. If the table column is already sorted, sorted column icon appears in the right side of the column header. Click on the sortable table column header to change sorting direction.
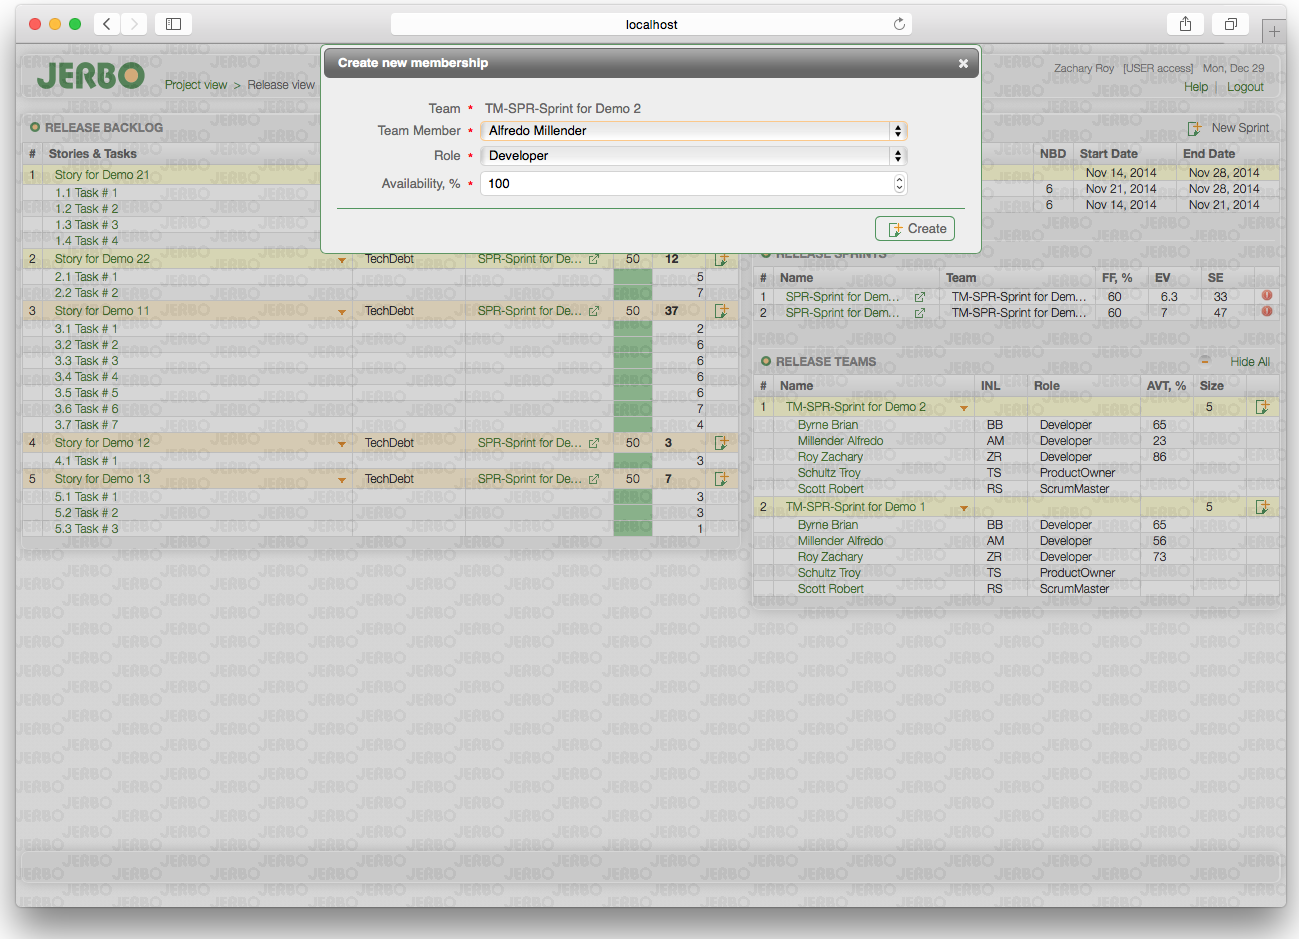
Table rows followed by the "Expend/Collapse row" icon are expandable. For example, team name in "Release Teams" table is expandable and, if you click on 'expand' icon, will show all team memberships.
Tables having "Show/Hide All" icon have expandable rows. For example, if you click on the 'Show All' icon above the release backlog table, all tasks for all stories in this table will be shown.
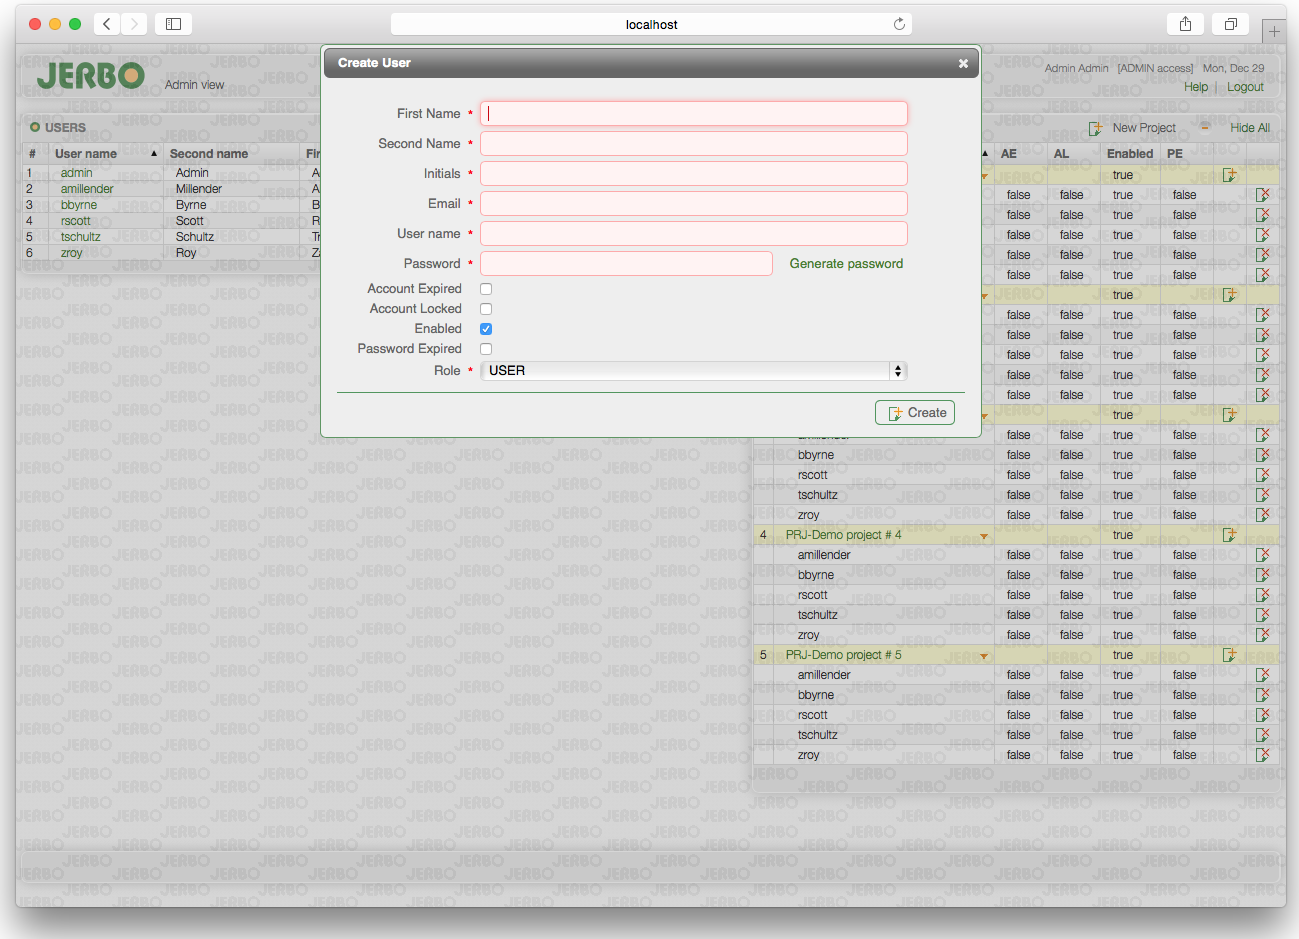
To present information in a compact way, some table headers contains abbreviations and all long values in table rows are truncated. To see the meaning of the abbreviation or truncated table entries in full simply move the mouse over the table header or long table entry [truncated entries are followed by three dots - "…"] For the same purpose, the 2-3 letter initials field is required to create new application user, and this field will be used instead of the full user name in different views and tables, and as usual, full name will be displayed on mouse over.
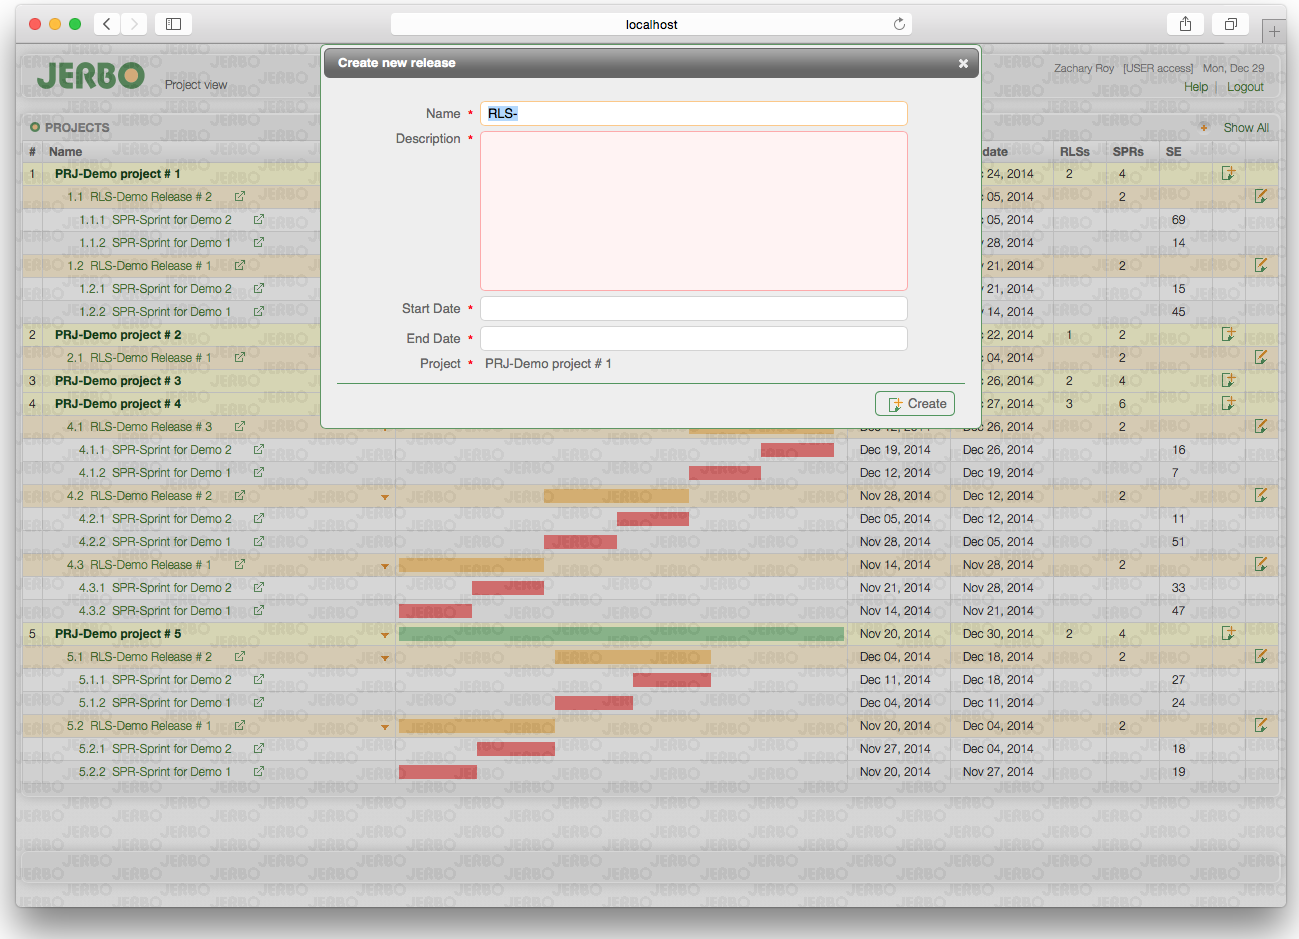
To keep project information consistent, multiple constraints are used by the application. Most of them related to the data provided while adding or editing project information [format, range, etc.]. If any of the application constraints is violated, an appropriate error message will appear on the modal window [used for creation, editing, and deletion], explaining which field data is not valid and which value is expected. For example, when you create new release, release dates will be validated to ensure they are within the project date range.
This view is for application administration. It combines a set of features for project and user management. Application administrators use this view to manage application users, projects and permissions.
Admin Screen short goes here with the following numbers on it:
| View | Table | Acr & Abbr | Meaning |
|---|---|---|---|
| Admin | |||
| Users | INL | Initials | |
| Projects & Users | AE | Account Expired | |
| Projects & Users | AL | Account Locked | |
| Projects & Users | PE | Password Expired |
This view is for all users and is the place they can see projects, project releases, and sprints. This view is used for release planning and navigation through the project tree [releases and sprints].
The only panel has one table –PROJECT LIST. This panel contains functions for release planning: adding and editing release information. ‘PROJECTS’ table rows could be sorted by ‘Name’ column. Releases and sprints are sorted by start date; the way that the most recent ones come first in the list. Project timeline visualizes the project, release and sprint schedule and duration.
| View | Table | Acr & Abbr | Meaning |
|---|---|---|---|
| Projects | |||
| Projects | RLSs | Releases | |
| Projects | SPRs | Sprints | |
| Projects | SE | Sprint Estimation |
This view is for sprint planning. It combines a set of features to work with release and sprint backlogs [stories and tasks], sprint planning, and sprint team management.
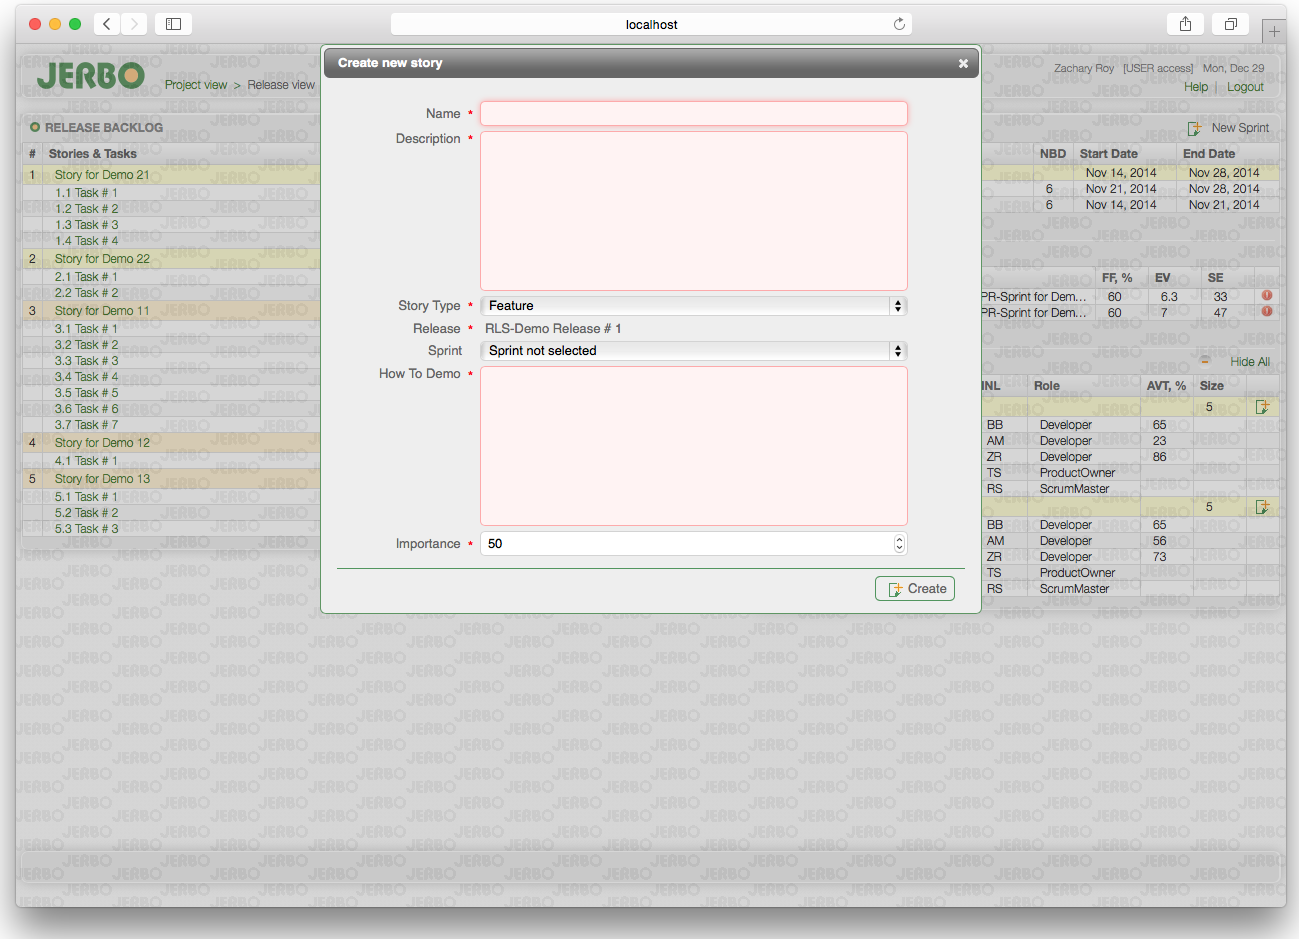
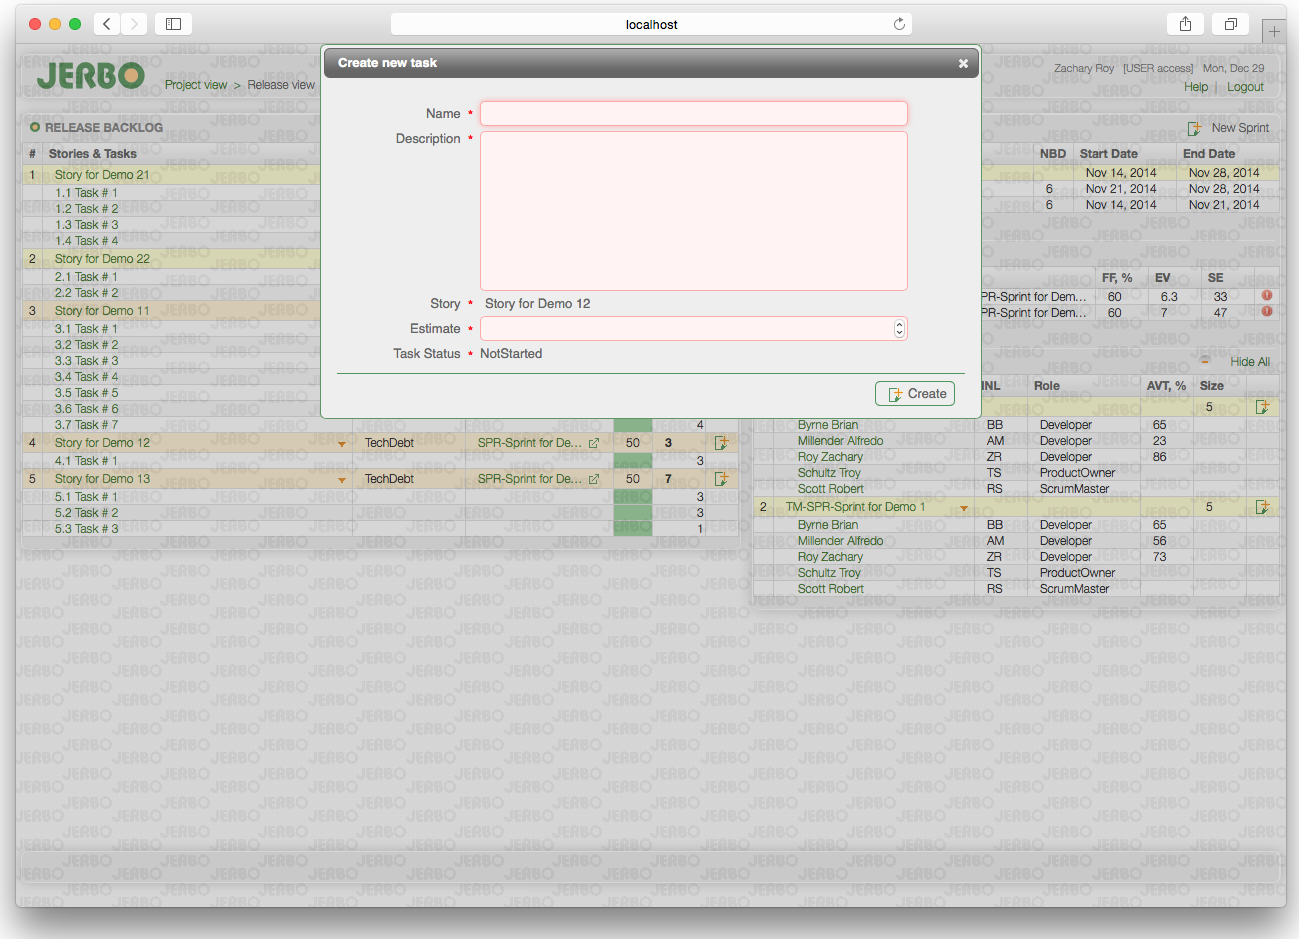
Left panel contains just one table – RELEASE BACKLOG. This panel contains functions for backlog maintenance and can be used to add and edit stories and tasks. Stories in release backlog are sorted by priority, name, and sprint. Stories not included in any sprint are shown in the top of the backlog. Stories from different sprints have different background colors.
Right panel contains three tables: RELEASE DETAILS, RELEASE SPRINTS, and RELEASE TEAMS. This panel contains functions for release, sprint and team planning and could be used to create and edit release and sprint information [RELEASE DETAILS table], view sprint details [RELEASE SPRINTS table], and build teams for each sprint [RELEASE TEAMS table].
| View | Table | Acr & Abbr | Meaning |
|---|---|---|---|
| Release | |||
| Release Backlog | Imp. | Importance [priority] | |
| Release Backlog | Est. | Estimate | |
| Release Details | NBD | Number of business days in sprint | |
| Release Sprints | FF | Focus Factor | |
| Release Sprints | EV | Estimated Velocity | |
| Release Sprints | SE | Sprint estimation | |
| Release Teams | INL | Initials | |
| Release Teams | AVT | Availability |
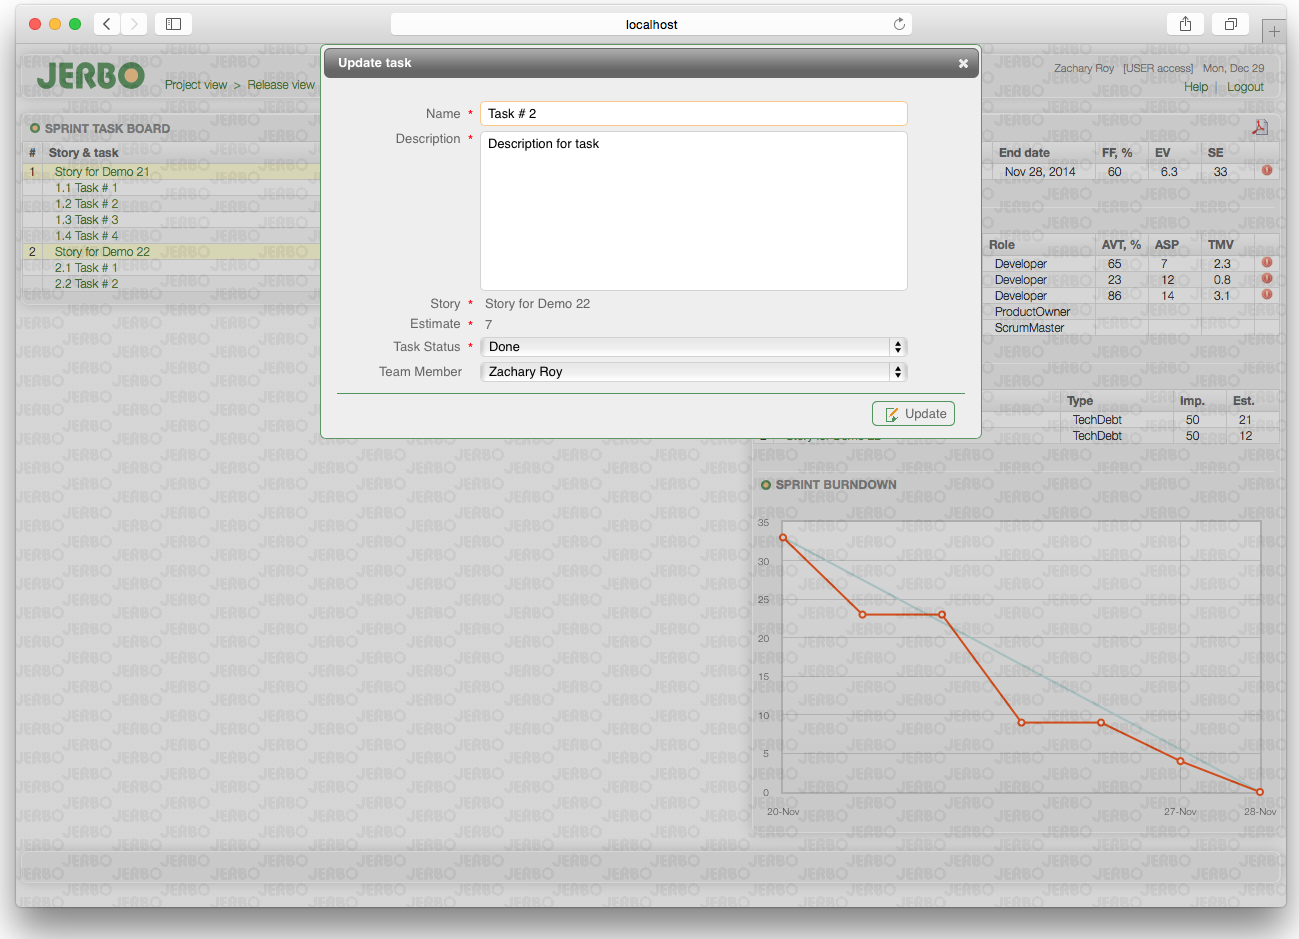
This view is for sprint execution [sprint task board]. It contains set of features to work with Sprint backlog [task board], track progress [burndown chart], and run sprint report. This view keeps all sprint related information summarized and provides some convenient sprint backlog view filters. This is the primary view used by the team during the Daily Stand Up meetings.
Left panel contains just one table – SPRINT TASK BOARD. This panel contains functions for sprint backlog maintenance and can be used to edit stories and tasks [assign task to team member, update task status etc.]. Stories in sprint backlog are sorted by priority and name. View filters could be used to filter tasks by status and ownership
Right panel contains three tables and SPRINT BURNDOWN chart. SPRINT DETAILS table contains sprint detail information and could be used to generate sprint report [PDF export icon]. SPRINT TEAM shows sprint team membership details. SPRINT BACKLOG SUMMARY provides summarized sprint backlog information. SPRINT BURNDOWN chart provides a simple view of the sprint progress.
| View | Table | Acr & Abbr | Meaning |
|---|---|---|---|
| Sprint | |||
| Sprint task board | SE | Story Estimation | |
| Sprint task board | STE | Story Task Estimation | |
| Sprint task board | AN | Assignee | |
| Sprint task board | NS | Not Started | |
| Sprint task board | IP | In Progress | |
| Sprint task board | IM | Impeded | |
| Sprint task board | DN | Done | |
| Sprint details | FF | Focus Factor | |
| Sprint details | EV | Estimated velocity | |
| Sprint details | SE | Sprint Estimation | |
| Sprint team | INL | Initials | |
| Sprint team | AVT | Availability | |
| Sprint team | ASP | Assigned Story Points | |
| Sprint team | TMV | Team Member Velocity | |
| Sprint backlog summary | Imp. | Importance [priority] | |
| Sprint backlog summary | Est. | Estimation |
This Quick Start will guide you through the steps you need before you start the first Sprint.
1. Add application users [Admin View -> New User].
Before you start a project, all members of you Scrum team have to be added to the application user list and they have to be granted project access.
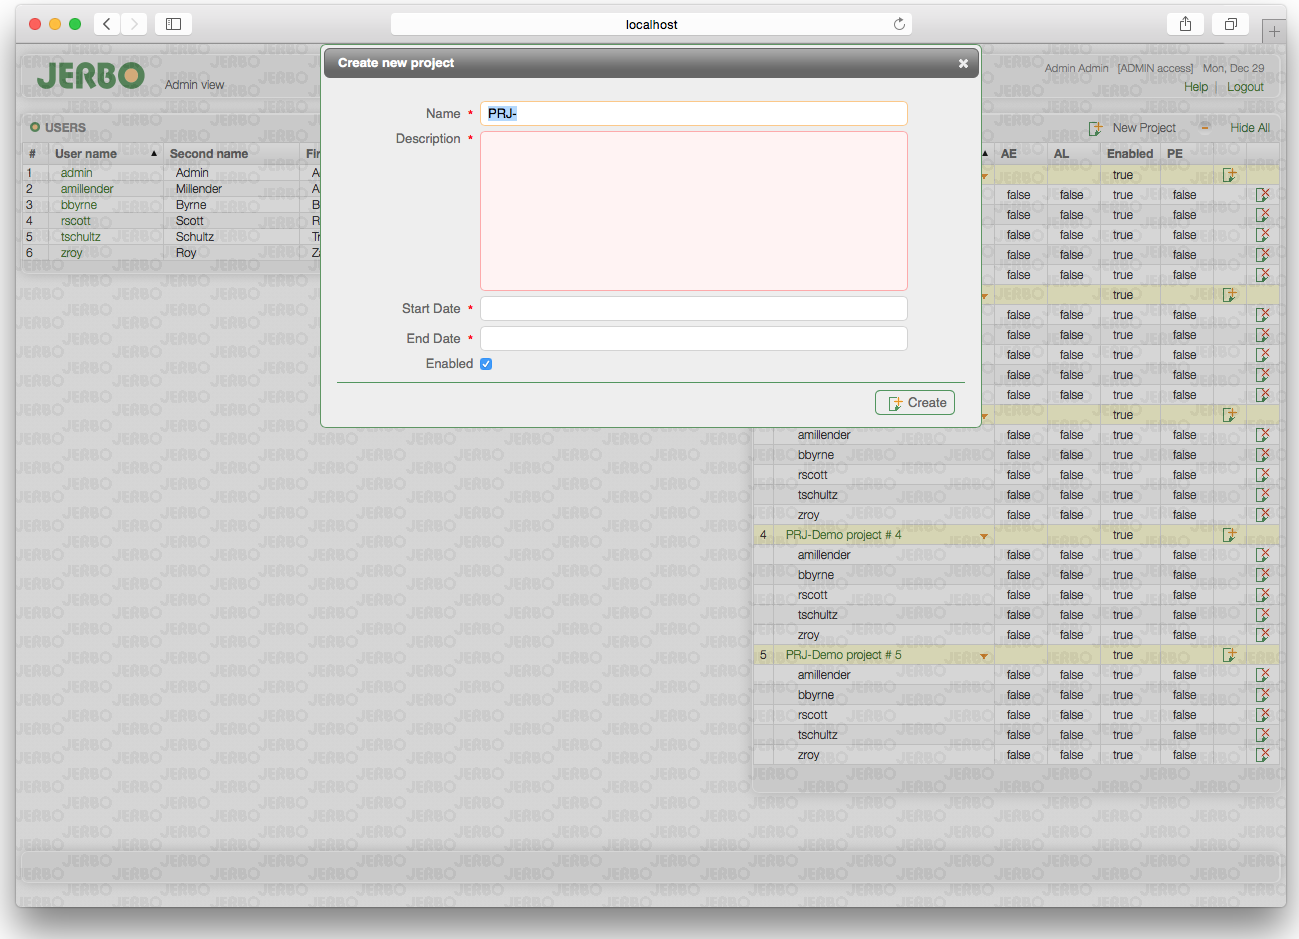
2. Create new project [Admin View -> New Project].
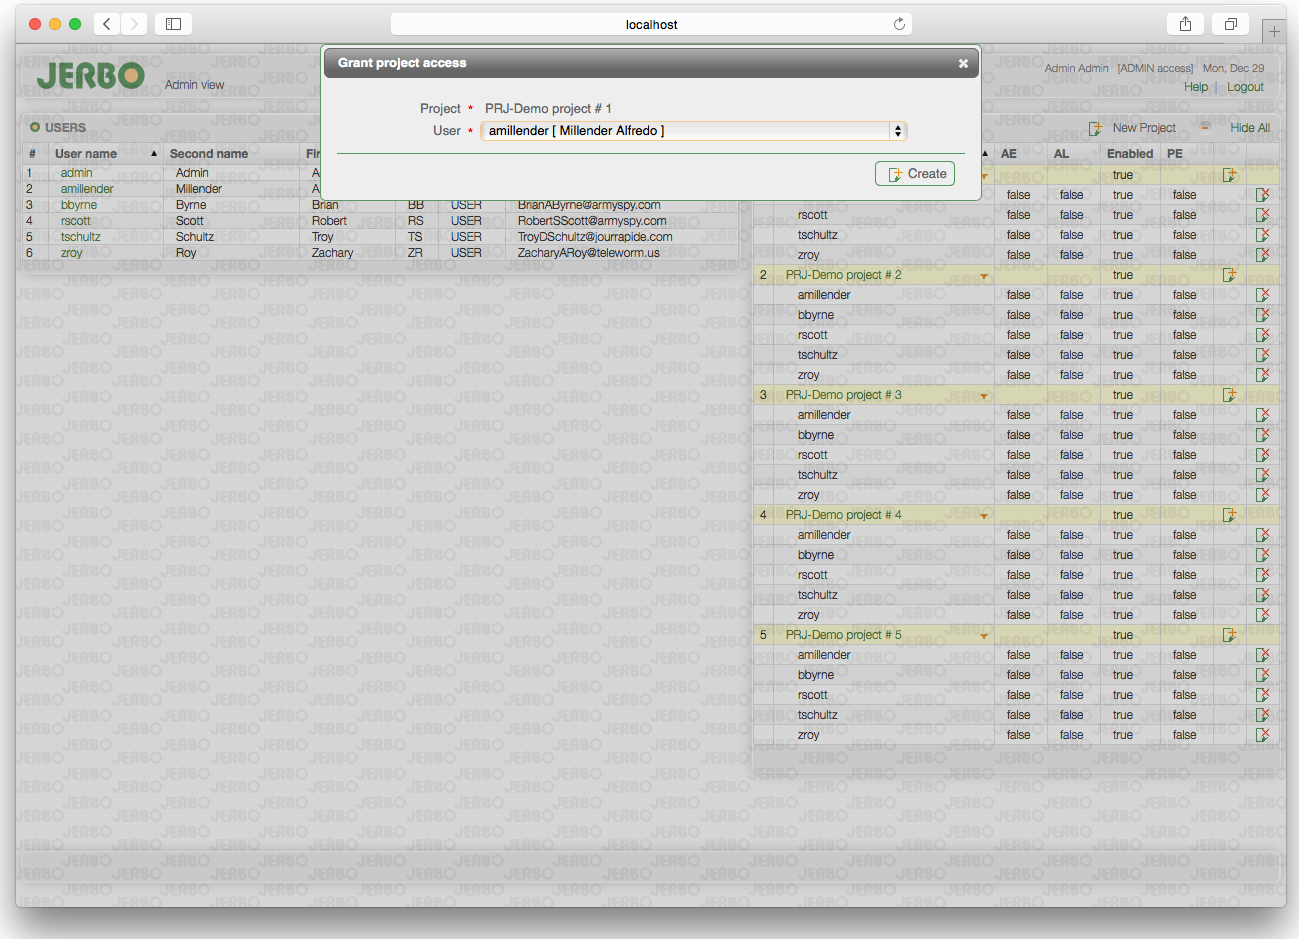
3. Grant project access to users [Admin View -> Grant Access].
4. Create new release [Project View -> Create Release].
5. Build release backlog [Project View -> Release View].
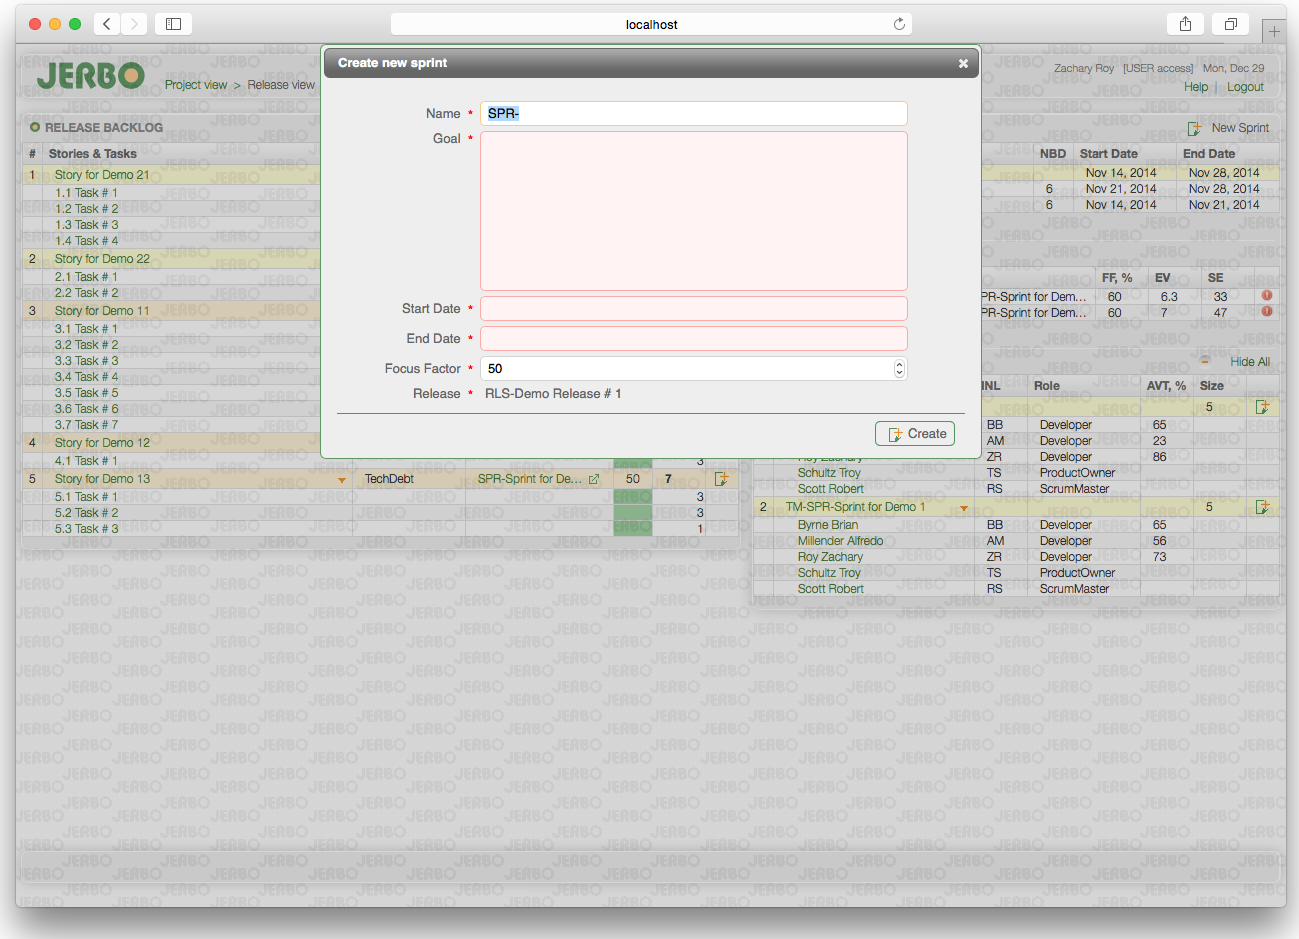
6. Create Sprint [Release View -> Create Sprint].
7. Build sprint team [Release View -> Create new membership].
8. Create Sprint backlog, sprint planning [Release View].
At this point, the team decides how many stories to include in the sprint based on the following values: story priority, story estimation and team estimated velocity.
9. Execute Sprint and track progress [Sprint View -> Update Task].
The following table briefly describes how different Scrum artifacts and notions are implemented in JERBO.
| SCRUM | JERBO | View | Comments |
|---|---|---|---|
| NA | App users | Admin View | JERBO administrator manages application users, projects and permissions. |
| NA | Project | Project View | Scrum team works on a project. Project has Releases and Releases have Sprints. Project view shows all active projects and provides release and sprint schedule details. |
| NA | Release | Release View | Release is a deployable software package, the result of several iterations – Sprints. Release backlog contains stories scheduled for this release and Sprint backlog is a subset of stories from the release backlog. Release view is used for Release and Sprint planning. |
| Sprint | Sprint | Release view, Sprint view |
Scrum Master creates new Sprint from the Release view [Release Details table] providing start and end dates, focus factor and a goal. Team is created automatically for each new Sprint. Team size and member’s availability could be different from sprint to sprint. |
| Team | Team | Release view [Release Teams] |
Team is created automatically for each new Sprint. Users having project access [and role USER] could be added to the team. |
| Scrum Master, Product Owner, Developer | Scrum Master, Product Owner, Developer | Release view [Release Teams] |
Each team member in Sprint team has one of the following roles: Scrum Master, Product Owner, or Developer. Team members with "Developer" role only will be taken into account for Sprint velocity calculation. |
| Product Backlog | Release backlog | Release view [Release Backlog] |
Project may have multiples releases. Release may comprise multiple stories forming Release Backlog. Project backlog does not exist in JERBO, it is spread in multiple release backlogs. |
| Sprint planning, Sprint Backlog | Sprint Backlog | Release view, Sprint view [task board] |
During the Sprint planning meeting, team decides which stories from the Release backlog [prioritized and estimated] could be implemented in the next Sprint. Stories included in Sprint form Sprint backlog. |
| Estimation | Estimation | Release view | Story estimate is a sum of all story tasks" estimates. Task estimation unit is Story Point which, in our case, is equal to one ideal man-day [8 hours of work without interruptions]. |
| Focus Factor | Focus Factor | Release view [Release Sprints] |
Focus Factor [FF] is an estimate of how focused the team is. Team provides FF value when it creates new Sprint. A low FF value means that team expects to have many disturbances. For a new team, FF equal to 60% will be a good starting point. |
| Estimated Velocity | Estimated Velocity | Release view [Release Sprints] |
Sprint Estimated Velocity is calculated based on number of business days in sprint, focus factor, available man-days [team size and team members" availability]. The goal is to help team simply to decide which stories to include in the sprint. |
| Technical Debt | Technical Debt | Release view, Sprint view |
Each Story in application has one of the following types: Feature, UnPlanned, Defect and TechDebt |
| Definition of Done |
NA | There is no functionality related to DoD. | |
| Impediment Backlog | NA | Release View, Sprint View |
Tasks in JERBO may have one for the following statuses: NotStarted, InProgress, Impeded, and Done. Impeded tasks have red color in respective task status columns. |
| Burndown Chart | Burndown Chart | Sprint View | Sprint Burndown chart is built based on the current Sprint state and lets the team track Sprint progress. |
For detailed information, please see respective section of this guide.
| View | Table | Acr & Abbr | Meaning |
|---|---|---|---|
| Admin | |||
| Users | INL | Initials | |
| Projects & Users | AE | Account Expired | |
| Projects & Users | AL | Account Locked | |
| Projects & Users | PE | Password Expired | |
| Project | |||
| Projects | RLSs | Releases | |
| Projects | SPRs | Sprints | |
| Projects | SE | Sprint Estimation | |
| Release | |||
| Release Backlog | Imp. | Importance [priority] | |
| Release Backlog | Est. | Estimate | |
| Release Details | NBD | Number of business days in sprint | |
| Release Sprints | FF | Focus Factor | |
| Release Sprints | EV | Estimated Velocity | |
| Release Sprints | SE | Sprint estimation | |
| Release Teams | INL | Initials | |
| Release Teams | AVT | Availability | |
| Sprint | |||
| Sprint task board | SE | Story Estimation | |
| Sprint task board | STE | Story Task Estimation | |
| Sprint task board | AN | Assignee | |
| Sprint task board | NS | Not started | |
| Sprint task board | IP | In Progress | |
| Sprint task board | IM | Impeded | |
| Sprint task board | DN | Done | |
| Sprint details | FF | Focus Factor | |
| Sprint details | EV | Estimated velocity | |
| Sprint details | SE | Sprint Estimation | |
| Sprint team | INL | Initials | |
| Sprint team | AVT | Availability | |
| Sprint team | ASP | Assigned Story Points | |
| Sprint team | TMV | Team member velocity | |
| Sprint backlog summar | Imp. | Importance [priority] | |
| Sprint backlog summary | Est. | Estimation |
![[Admin view screenshot]](images/jerbo_admin_view.png)
![[Project view screenshot]](images/jerbo_project_view.png)
![[Release view screenshot]](images/jerbo_release_view.png)
![[Sprint view screenshot]](images/jerbo_sprint_view.png)